Multiple Site Manager
Overview
The Multiple Site Manager empowers you to create and manage multiple “websites” (Sites) from a single ExpressionEngine installation. These Sites can use your existing domain, sub-domains, a brand new domain, or a combination of the above. Each Site is has its own set of preferences, templates, and channels. This lets you leverage a single ExpressionEngine installation across multiple internet properties.
From School House to University
Think of the Multiple Site Manager as converting a one-building school house into a University campus. The student body (Member database) is campus wide but every department (Site) has its own building (templates), its own way of doing things (preferences), unique curriculum (channels), student lounge (Site specific forums, requires Discussion Forums 2.0+), and rules about what students can do (Member Role permissions are Site specific). Any department on Campus can take advantage of the schools resources (Modules, Plugins, Extensions).
That’s not a perfect analogy but it conveys the scope of what the Multiple Site Manager enables you to do from a single ExpressionEngine installation.
Creating a Site
The site manager must be enabled in Control Panel setting: Settings > General Settings > Enable Site Manager? in order to create sites.
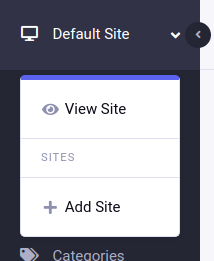
Once MSM is enabled a new site can be created or edited by clicking the icon next to the site name in the top of the Control Panel sidebar and either selecting the site to edit or adding a new site.

Available settings for a site are:
- Name: Full name of the site
- Short Name: Short name for the site (No spaces. Underscores and dashes are allowed)
- Description: A brief description of this site.
- Color coding for the site: Allows for applying a custom color to the top of the control panel’s sidebar when the site is selected as the current site in the control panel.
Tip: Color-Coding MSM Sites
Setting Up Multiple Sites
All Sites must reside on the same server If using sub-domains or domains, directories must be able to access your main installation system directory.
It is recommended that you Create a Site before setting up the domain or sub-domain.
Step 1
Create the domain or subdomain using your webhost’s tools. Typically this will automatically create a new folder on the server that the site’s files will be served from. Please contact your host if you need assistance with this step.
The new folder must allow files within it to access your installation’s system folder. Check with your host to ensure you don’t have “open_basedir” or other restrictions in place which could prevent this.
Step 2
Copy the admin.php and index.php files from your first (default) site’s folder to your new site’s folder. We’ll call the new site domain2 for the purposes of this example.
Example
Your single-site installation might have looked like:
└── domain1.com
    ├── admin.php
    ├── index.php
    ├── images
    ├── system
    └── themes
Now that domain2 has been added, your folders might look like:
└── domain1.com
    ├── admin.php
    ├── index.php
    ├── images
    ├── system
    └── themes
└── domain2.com
    ├── admin.php
    └── index.php
Step 3
Open domain2’s new admin.php file (this is the file that allows Control Panel access on the new site) and make the following changes:
Update the
$system_pathvariable to indicate the path from this file to your installation’s system folder. Typically this can be a relative path, but some servers may require a full, absolute path. For example, given the folder structure above:$system_path = '../domain1.com/system/';Uncomment the following
$assign_to_configvariables. Set the Short Name of the site this file will log into, and this file’s URL. For example:$assign_to_config['site_name'] = 'domain2_short_name'; $assign_to_config['cp_url'] = 'https://domain2.com/admin.php';
Tip: In some multi-site situations, you may not want to allow Control Panel access from anywhere other than domain1. The admin.php file can be removed in those cases.
Step 4
Open domain2’s new index.php file and make the following changes:
Update the
$system_pathvariable to indicate the path from this file to your installation’s system folder. Typically this can be a relative path, but some servers may require a full, absolute path. For example:$system_path = '../domain1.com/system/';Uncomment the following
$assign_to_configvariables. Set the Short Name of the site this file will display, the URL of this site’s admin.php file, and the main URL of the site (without index.php). For example:$assign_to_config['site_name'] = 'domain2_short_name'; $assign_to_config['cp_url'] = 'https://domain2.com/admin.php'; $assign_to_config['site_url'] = 'https://domain2.com';
Multi Site Login
If you have multiple sites, you may prefer that when a user logs into one site, they are logged into all sites.
In order for multi site login to work, all of the sites must use cookies only to hold the session data on the frontend. In Settings --> Security and Privacy: make sure the Website Session type is set to Cookies only for each site you want to include.
If your sites are in separate subfolders (https://example.com/site2/index.php) or separate subdomains (https://site2.example.com) you can simply set the cookie domain for each site to the top level domain.
In the case of https://example.com/site2/index.php or https://site2.example.com type URLs, the cookie domain should be .example.com.
Logging in on any of the URLs would result in cookies that can be read on any subfolder or subdomain of the example.com URL.
However, cookies for one domain cannot be set from a different domain. If your sites use different domains, you’ll need to use the multi_login_sites configuration override. Add the following to your system/user/config/config.php file, modified according to the domain names used by your sites:
$config['multi_login_sites'] = "https://www.example.com/index.php|https://www.sitetwo.com/index.php";
Now when a user logs into the frontend of one of the sites, the login routine will invisibly loop through each URL in the configuration, redirecting to that site, setting the appropriate cookies, and then cycling through to the next site. Once the user has been logged into all of the sites, they’ll end up back on the starting URL. The login redirects will be virtually unnoticeable.
